Generating Mesh Surfaces
You can generate a mesh surface that fully describes a feature of interest or anatomy after you have created a group of paths that outlines the feature of interest or anatomy (see Creating Groups of Paths). Options for optimizing mesh surface generation can be selected in the Mesh surface tab (see Mesh Surface Settings).
Mesh surfaces are calculated from the point clods on each path and the selected normals.
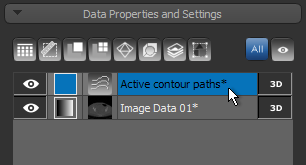
- Select the required group of active contour paths in the Data Properties and Settings panel.
- Select the paths you want to use to generate the mesh in the list of paths box.
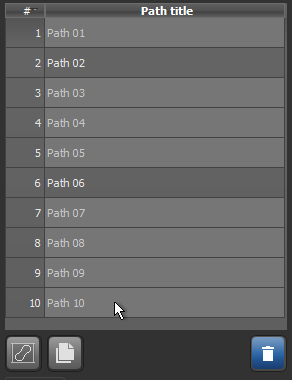
NOTE You can Ctrl-click to add paths to a selection one-by-one, or you can Shift-click to select paths within a range. Press Ctrl + A or your keyboard to select all paths in the group.
- Select the required settings on the Mesh surface tab (see Mesh Surface Settings).
- Click the Generate Mesh from Selected Paths button.
The mesh generated from the active contour paths appears in the Data Properties and Settings panel.
- Evaluate the generated mesh surface by scrolling through the dataset in different MPR views or examine the mesh surface in the 3D view (see Working with Meshes).

If required, you can edit the included paths or add additional paths. See Cutting Meshes for information about cutting meshes to generate paths in additional orientations.

Cutting a generated mesh surface provides an opportunity to add paths in other orientations to further refine an active contour model. New mesh surfaces can then be generated that include any of the additional paths cut from the selected mesh.
- Generate the required mesh surface or import a reference mesh.
- Select the view on which you want to cut the mesh.
For example, if you generated your mesh in an X-Y oriented view, you may want to cut it in an X-Z or Y-Z orientation.
- Select the required group of active contour paths in the Data Properties and Settings panel.
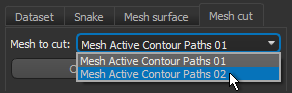
- Click the Mesh cut tab and then select the mesh you need to cut in the Mesh cut drop-down menu.
- Do one of the following:
- Click the Cut Single Slice on Current View button to cut the mesh on the current view.
A new path appears in the selected view and is listed in the Active Contour panel.

NOTE In some cases, such as a curved mesh in which multiple closed areas are contained within the selected view, more than one path may be cut.
- Select the number of slices you need as the Slice count in the Whole mesh cut box and then click the Cut Whole Mesh in Current View button.
New paths appear in the selected view and are listed in the Active contour panel.

- Click the Cut Single Slice on Current View button to cut the mesh on the current view.
- Examine the path(s) that were cut from the selected mesh.
NOTE You can quickly view a selected path onscreen by clicking the Look at Path
 button at the bottom of the path list.
 - If required, you can refine any of the cut paths by iteration or by manually editing it with the Repulsor tool.
- Generate a new mesh surface that includes any or all of the paths cut from the selected mesh along with the original paths.